仅使用Nginx实现HTTPS正向代理

Nginx 正向 HTTPS 代理,需要插件 ngx_http_proxy_connect_module 支持,且需要 auth_basic 作为访问认证,但由于 auth_basic 模块只能处理 Authorization header,所以还要加入 lua-nginx-module 来处理 Proxy-Authorization header 认证。

简单点讲就是需要 nginx 加入 ngx_http_proxy_connect_module 和 lua-nginx-module 两个插件,来处理正向代理和认证。

下面服务端以 Debian10 来示范一下编译、安装过程。

开始之前,先安装一下依赖工具:

apt update -y

apt install -y build-essential libtool libpcre3 libpcre3-dev zlib1g-dev openssl libssl-dev wget git

ngx_http_proxy_connect_module插件

这个插件,就是用来处理 HTTPS 正向代理的,项目地址:

https://github.com/chobits/ngx_http_proxy_connect_module

下载插件,以下俺未标记目录的,默认就是 root 目录:

git clone https://github.com/chobits/ngx_http_proxy_connect_module.git

lua-nginx-module插件

需要先安装LuaJIT,并依赖ngx_devel_kit,如下:

安装LuaJIT

LuaJIT官网:http://luajit.org/

1
2
3
4
5
#下载
wget http://luajit.org/download/LuaJIT-2.0.5.tar.gz -O - | tar -xz
#编译
cd LuaJIT-2.0.5
make install PREFIX=/usr/local/LuaJIT

安装完成后会显示:

==== Successfully installed LuaJIT 2.0.5 to /usr/local/LuaJIT ====

设置环境变量:

vi /etc/profile

添加变量:

1
2
export LUAJIT_LIB=/usr/local/LuaJIT/lib
export LUAJIT_INC=/usr/local/LuaJIT/include/luajit-2.0

最后:source /etc/profile

下载ngx_devel_kit

项目地址:https://github.com/simplresty/ngx_devel_kit

回到 root 目录,下面下载的文件都在 root 目录:

cd ..

只需要下载就好了,不需要安装:

git clone https://github.com/vision5/ngx_devel_kit.git

下载lua-nginx-module

项目地址:https://github.com/openresty/lua-nginx-module

只需要下载就好了,不需要安装:

git clone https://github.com/openresty/lua-nginx-module.git

下载lua-resty-core

项目地址:https://github.com/openresty/lua-resty-core

只需要下载就好了,稍后安装:

git clone https://github.com/openresty/lua-resty-core.git

下载lua-resty-lrucache

项目地址:https://github.com/openresty/lua-resty-lrucache

只需要下载就好了,稍后安装:

git clone https://github.com/openresty/lua-resty-lrucache.git

编译Nginx

这次来下载 openresty 版的 Nginx 来编译:

1
2
3
4
5
6
7
8
9
10
11
12
13
14
15
16
17
18
19
20
21
22
23
24
25
26
27
28
29
wget https://openresty.org/download/nginx-1.19.3.tar.gz -O - | tar -xz

cd nginx-1.19.3/

patch -p1 < /root/ngx_http_proxy_connect_module/patch/proxy_connect_rewrite_1018.patch

./configure --prefix=/etc/nginx \
--sbin-path=/usr/sbin/nginx \
--modules-path=/usr/lib/nginx/modules \
--conf-path=/etc/nginx/nginx.conf \
--error-log-path=/var/log/nginx/error.log \
--http-log-path=/var/log/nginx/access.log \
--pid-path=/var/run/nginx.pid \
--lock-path=/var/run/nginx.lock \
--with-http_v2_module \
--with-http_ssl_module \
--with-http_gzip_static_module \
--with-http_stub_status_module \
--with-http_sub_module \
--with-stream \
--with-stream_ssl_module \
--with-pcre \
--add-module=/root/ngx_http_proxy_connect_module \
--with-ld-opt=-Wl,-rpath,/usr/local/LuaJIT/lib \
--add-module=/root/ngx_devel_kit \
--add-module=/root/lua-nginx-module

make
make install

上面 nginx 就算编译完成了,再来安装一下 lua-resty-core 和 lua-resty-lrucache 依赖:

1
2
3
4
5
6
7
8
cd ..
cd lua-resty-core
make install PREFIX=/opt/nginx

cd ..
cd lua-resty-lrucache
make install PREFIX=/opt/nginx

最后把 path 引用加入 nginx 配置文件就好了,下面配置文件已添加:

lua_package_path "/opt/nginx/lib/lua/?.lua;;";

Nginx配置文件

在写 nginx 配置文件之前,俺们先配置一下Basic Auth用户和密码。

配置Basic Auth

1
2
3
4
5
6
7
8
9
10
11
12
13
mkdir /etc/nginx/conf.d

cd /etc/nginx/conf.d

#用 openssl 生成密码为12345,或者别的密码

openssl passwd 12345

#会输出一串密钥
fIHcRVEKijgoM

#然后把密钥写入 htpasswd 文件,其中 admin 为用户名
echo "admin:fIHcRVEKijgoM" > htpasswd

这个用户名和密码,后面连接代理的时候会用到。

407标头和传输检查

vi /etc/nginx/conf.d/proxy_auth.lua

添加如下内容:

1
2
3
4
5
6
7
8
-- check Proxy-Authorization for https://developer.mozilla.org/en-US/docs/Web/HTTP/Status/407
if not ngx.var.http_proxy_authorization then
ngx.header["Proxy-Authenticate"] = "Basic realm=\"Access to internal site\""
ngx.exit(407)
end

-- transfer Proxy-Authorization header to Authorization for auth basic module
ngx.req.set_header("Authorization", ngx.var.http_proxy_authorization)

nginx.conf配置文件

vi /etc/nginx/nginx.conf

1
2
3
4
5
6
7
8
9
10
11
12
13
14
15
16
17
18
19
20
21
22
23
24
25
26
27
28
29
30
31
32
33
34
35
36
37
38
39
40
41
42
43
44
45
46
47
48
49
50
51
pid /var/run/nginx.pid;
worker_processes auto;
worker_rlimit_nofile 51200;
events {
worker_connections 1024;
multi_accept on;
use epoll;
}

http {
server_tokens off;
sendfile on;
tcp_nopush on;
tcp_nodelay on;
keepalive_timeout 120s;
keepalive_requests 10000;
types_hash_max_size 2048;
include /etc/nginx/mime.types;
lua_package_path "/opt/nginx/lib/lua/?.lua;;";
access_log off;
error_log /dev/null;

server {
listen 3128 ssl;
server_name xxxx.com;

ssl_certificate_key /etc/letsencrypt/live/xxxx.com/privkey.pem;
ssl_certificate /etc/letsencrypt/live/xxxx.com/fullchain.pem;
ssl_session_cache shared:SSL:1m;

auth_basic "Hello, World!";
auth_basic_user_file /etc/nginx/conf.d/htpasswd;

resolver 8.8.8.8;

rewrite_by_lua_file /etc/nginx/conf.d/proxy_auth.lua;


proxy_connect;
proxy_connect_allow all;
proxy_connect_connect_timeout 10s;
proxy_connect_data_timeout 10s;

location / {
proxy_pass http://$host;
proxy_set_header Host $host;
proxy_hide_header Authorization;
proxy_hide_header Proxy-Authorization;
}
}
}

申请域名证书

首先还是要到 DNS 上添加一个 A 记录,这个就不赘述了。然后申请证书如下:

安装certbot:

apt install certbot -y

certbot申请证书:

certbot certonly --standalone --email [email protected] -d xxxx.com

运行完成后,会生成类似下面路径的证书,这个路径已经添加到nginx配置文件里面了,你只需要修改下域名:

1
2
/etc/letsencrypt/live/xxxx.com/fullchain.pem    #证书公钥,xxxx.com是你的域名
/etc/letsencrypt/live/xxxx.com/privkey.pem #证书私钥

启动Nginx

首先还是要写个 systemd 守护进程:

vi /lib/systemd/system/nginx.service

添加内容如下:

1
2
3
4
5
6
7
8
9
10
11
12
13
14
15
16
[Unit]
Description=The NGINX HTTP and reverse proxy server
After=syslog.target network-online.target remote-fs.target nss-lookup.target
Wants=network-online.target

[Service]
Type=forking
PIDFile=/var/run/nginx.pid
ExecStartPre=/usr/sbin/nginx -t
ExecStart=/usr/sbin/nginx
ExecReload=/usr/sbin/nginx -s reload
ExecStop=/bin/kill -s QUIT $MAINPID
PrivateTmp=true

[Install]
WantedBy=multi-user.target

重载服务:systemctl daemon-reload

然后就可以启动Nginx了:

systemctl start nginx

Nginx的常用命令

systemctl enable nginx #设置开机自动启动

systemctl status nginx #查看运行状态,显示running表示成功运行

systemctl reload nginx #重新载入

systemctl restart nginx #重新启动

客户端使用

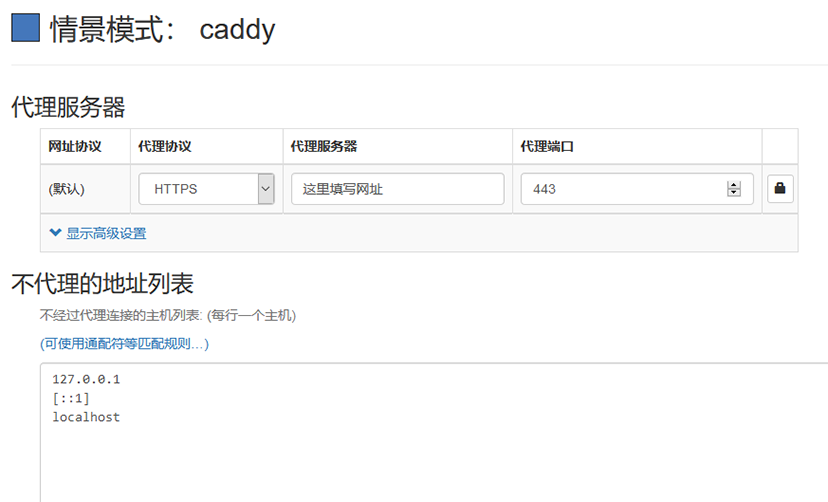
电脑端浏览器安装 SwitchyOmega 插件,新建一个代理情景模式,代理协议填写HTTPS,代理服务器填写你的域名,端口填写你使用的端口,如上 nginx 配置端口就填写3128,最后点击右边小锁,填写你的用户名(admin)和密码(12345)就可以使用了,如果需要分流的话,可以另建立一个自动切换模式。

在 SwitchyOmega 插件上设置代理自动分流模式,另新建一个自动切换模式,设置如下图:

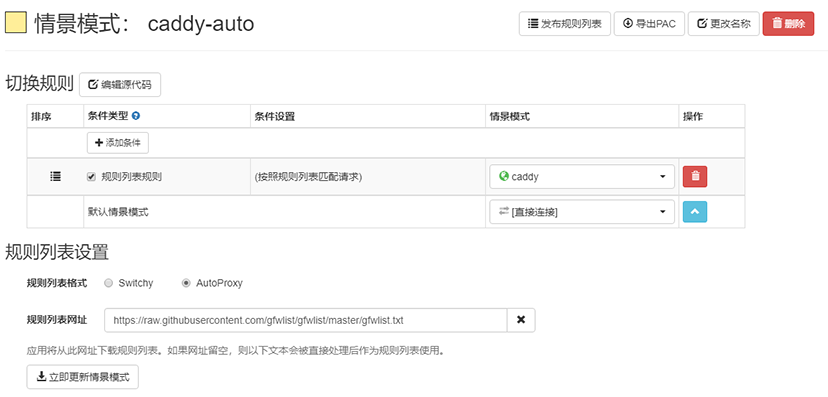
AutoProxy:https://raw.githubusercontent.com/gfwlist/gfwlist/master/gfwlist.txt

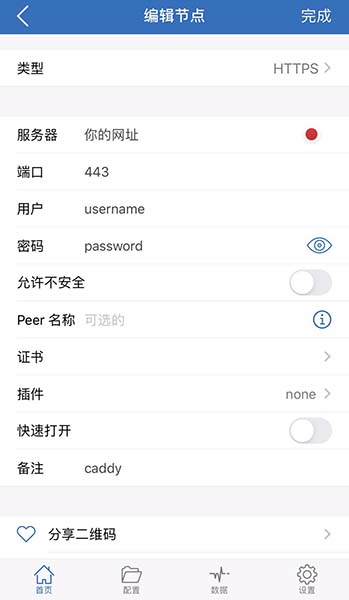
移动端,俺们以小火箭和 Quantumult X 为例,小火箭,选择 HTTPS 代理,服务器填写你的域名,端口3128:

Quantumult X 配置文件/编辑/server_local字头下填写:

http=xxxx.com:3128, username=用户名, password=密码, over-tls=true, tls-host=xxxx.com, fast-open=false, udp-relay=false, tag=NGINX

最后推荐几个移动端支持https代理软件,iOS:Quantumult X ,小火箭, Android:Clash Surfboard.